Doing your own telephone wiring

Note: this page describes the phone wiring conventions in the United States. I'm not familiar with the phone wiring conventions outside the U.S., so the information here may not apply in your country.
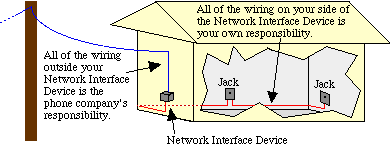
Residential phone wiring: whose responsibility?
In years gone past, it was the responsibility of the phone company not only to bring phone service to your house but to do the phone wiring within your house as well. This is no longer the case. When you order phone service to your house, the local phone company installs a network interface device, a sturdy grey plastic box usually mounted either in your basement or on an outside wall.
You can do your inside wiring yourself, or you can pay the local phone company or a third party (such as an electrician) to do it for you. Doing residential phone wiring is easy, however, and the local phone company's charges for this service are steep. Even if you have to buy wire and modular jacks, you're going to come out way ahead if you do your own work.
Installing extra lines can be a problem if you rent an apartment in a multi-unit building. The wiring between the network interface device and the apartment is not the phone company's responsibility, so you'll have to work out with your landlord who's going to do the in-between wiring if you need additional lines. Your landlord may not want you to do the wiring for fear you don't know what you're doing; but the landlord may also object to picking up the tab if the phone company does the work. Whose responsibility it actually is probably depends on your lease.
I once had a deadbeat landlord who I didn't even bother approaching when I needed a second line installed. Instead, I just ran my own wire out thru a hole I drilled in the window frame and down a six-story fire escape in the alley to the basement, where I had the phone company representative install an ordinary residential network interface device for me next to the big panel. When I moved, I just unhooked my piece of wire and rolled it up for my next wiring project, and then I spackled over the hole I had drilled. The landlord was none the wiser.
What this page is about
This page is mainly about installing additional phone lines, which is one of the most common phone wiring tasks in this age of modems and fax machines. What's described here are the color coding conventions for phone wiring, and how to make the connections. It's assumed that you know how to use a screwdriver and a drill.
It's also assumed that you have at least a rudimentary understanding of electrical safety. Phone wires carry low-voltage electricity, but you probably already know better than to do your wiring barefoot on a wet floor, for example. If you're touching the wires when the phone rings, you can get a substantial jolt; enough current goes thru to ring the old-type mechanical ringing devices consisting of a heavy clapper and some rather large bells, even though most modern phones no longer require so much current. Best policy is to disconnect your house at the Network Interface Device (see below) before working on wiring. Even a small shock can interfere with a pacemaker, according to one person who wrote to me. Also, for everybody, it's a bad idea to work on your phone wiring during thunderstorms.
In most residential phone wiring, the cable contains four individual wires. Most phone wire installed in the U.S. during the second half of the 20th century is of the following kind:
Four-strand wire:
The kind of wire shown above has recently become obsolete. For all new telephone wiring projects, you should use Cat 5 cable. All of the Cat 5 wire I've seen uses the following color coding:
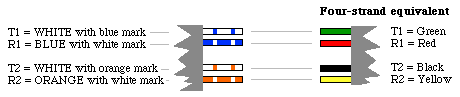
In either case, the important point is this: one phone line only requires two of these strands. In the vast majority of cases, the other two wires go unused-- but if you choose, you can certainly use them for a second line (i.e., a totally separate line with its own phone number, which the local phone company will connect to a second terminal in your network interface device). This means that if you are installing a second line for a fax, modem, etc., you usually don't have to actually physically run new wires; you can connect the extra two wires to the second phone line at the network interface device. Assuming that everything is wired properly thruout your house (i.e., nobody has cut corners by not bothering to connect the extra two wires somewhere along the way), this will give you "Line 2" service thruout the house.
If you're going to buy a two-line phone, there's nothing more you need to do, since a two-line phone expects "Line 2" to run on the yellow/black wires. For ordinary phone equipment such a modem, however, you have to convert a "Line 1" jack to a "Line 2" jack. One way you can do this is with a plug-in adapter, but the method described here involves swapping around a few wires in the jack.
Wiring at the network interface device
Don't be squeamish about poking around inside the Network Interface Device. It may look forbidding and official, but you have every right to be there.
The following two diagrams show the color coding scheme for the old kind of wire. This probably applies to your house if you're not running any new cable, and are simply running a second line thru the existing unused yellow/black wires. If you're running Cat 5 cable, you'll need to make the appropriate color conversions.
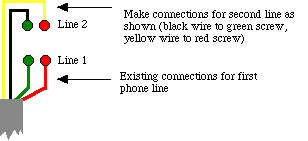
Converting a "Line 1" jack to a "Line 2" jack
Note that black is swapped for green, and yellow is swapped for red. Of course, it would also work if you consistently swapped the black and yellow wires the other way (black for red, yellow for green) but that is not the standard. Given that you have to be consistent between the two ends of the wire, you might as well follow the standard.
Converting a jack to Line 2 means that you will no longer be able to use it for Line 1. In practice, you'll probably want to install a second wiring block beside the first, and use a short piece of four-strand wire to extend the system from the existing block to the new one. This way, you can have a Line 1 jack right beside the Line 2 jack.
Caveat: It occasionally happens that the red and/or green wires become damaged and unusable, but that the black and yellow wires are intact. Repairpersons have sometimes remedied this by running the one phone line across the black and yellow wires rather than replacing the cabling. If this has happened, you won't be able to run a second line thru the four-strand wire. (This is uncommon, but it is a gotcha to be aware of).
Four-strand wire supports up to two phone lines. If you are installing three or four lines, you might also consider buying eight-strand wire. The color coding conventions for this kind of wire are as follows:
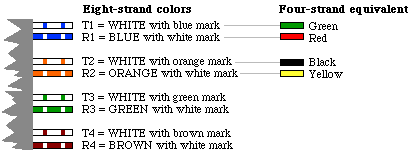
(There's also six-strand wire, which is the same as eight-strand wire with the brown pair left out. This color system actually extends up thru other colors to distinguish 25 different pairs, but even the most techno-geeky of us will probably never have that many phone lines in our homes. If you're interested, you can get the details to this system at Phone-Man's Home Page)
The conventions for eight-strand wire are as follows:
- Colored pairs match; e.g. WHITE with blue mark goes with BLUE with white mark for one phone line, etc.
- WHITE with whatever color mark corresponds to the green line of four strand wire.
- The pairs are used in the order pictured: thus, for the first line, you use blue; for the second, you use orange, etc. (My mnemonic is as follows: the colors run from sky to earth. Blue sky comes first; orange sunset on the horizon comes second; green trees come third; and brown earth comes fourth).
If you have very old existing wiring in your house, it may not follow the conventions described above, but new wiring should follow them.
Troubleshooting
If you think you've got everything hooked up correctly, but one or more of your lines is "dead" (no dial tone), the problem might be the local phone company's problem, or it might be in your own wiring. Be sure that the problem isn't in your own wiring or in one of your own phones before you call the phone company to check on the problem. If they determine that the problem is on their side of the network interface device, they have to fix the problem at no charge to you; but if they determine that the problem is on your side of the network interface device, they'll charge you just for having determined this, and they'll charge you a second time if you have them make the fix in your wiring for you.
So how can you tell whose problem it is? This is easy: when you open your network interface box, notice that there is a modular jack for each phone line. You can unplug the jack for the line in question (note that doing this unplugs your whole house from the phone company's network) and plug a working phone into the jack instead. This phone is now hooked directly into the phone company's network. If the phone works properly when connected in this manner, then the problem is in your own wiring. If the phone doesn't work, either your phone is broken or there's a problem in the phone company's network. Try a second phone which you know to work, and if there still seems to be no service on the line, the problem is probably on the phone company's side of the network interface device.
If the problem is in your own wiring, the following things might be wrong:
- You might have colors reversed at some point. Check your connections.
- A wire may have come loose from a screw in the network interface device or in one of your jacks. Check your connections.
- You may have a damaged wire. Depending on where the damage is, you might have service to some jacks in your house but not to others; you'll have to trace the wiring thru your house and figure out which stretch of wire contains the damage.
If you're getting static on the line, it's possible that there's a hole somewhere in the wire insulation which is letting in moisture and causing a short. Follow the wire from the network interface device to the jack and look for holes. For example, if you've used staples to fasten the wire to the wall, check for a staple puncturing the insulation.
Topology
There isn't any one right way to plan your house wiring. Some people prefer to run a separate wire all the way from the Network Interface Device to each jack (star topology); others prefer a system with branching at points other than the NID, and/or with one jack daisy-chained to the next:
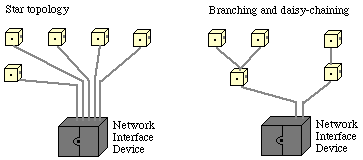
Star topology potentially uses a good bit more wire, but it is easier to troubleshoot because each jack is independent of the others.
I use the branching/daisy chaining approach myself. Fishing the wire is probably the most time-consuming part of the whole job, so if I'm just putting in one new jack, I'd usually rather just jump off of an existing jack than take the time to run a whole new wire all the way from the basement to the second floor. However, if the house has old, premodern wiring, the advantage to running a whole new wire is that I know exactly what I'm dealing with.
Tips on buying phone wiring materials
This section doesn't attempt to cover all the gadgets and parts related to phone wiring. For the wiring jobs described above, you usually only need to buy wire and modular jacks.
Modular jacks
Two gotchas when buying modular jacks. First, for ordinary residential wiring, you should buy the kind of modular jack with four contacts inside the jack; don't make the mistake of buying the wider modular jack with six contacts unless you're sure it's what you need (you've got to look closely to see the difference).

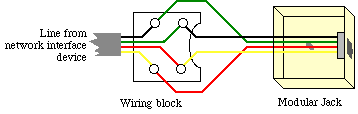
Second, you can buy modular jacks either with or without the wiring block (this is the heavy plastic piece which you mount to the wall, with screws to attach the wires to; see the picture higher up on the page). If you're installing a totally new jack, then you need the wiring block. If you're upgrading an existing, old-fashioned (pre-modular) connection to a modular jack, you might be able to use the existing wiring block, in which case you don't need to buy the kind of jack with the wiring block included; sometimes you can take the old cover off and just put a new modular cover over the old wiring block. In the store, it's hard to tell from outside the sealed package whether the block is included. Read the label carefully! More than once I've gotten home and realized I bought the wrong kind; it's an easy mistake to make.
Wire
As mentioned above, you should buy Cat 5 wire for all new phone wiring projects. The older four-color type allows more crosstalk between wires; this might be only a minor annoyance for voice lines, but it's a bigger problem for modems or DSL lines. Even if you don't have immediate plans to transmit this kind of data across your line, it's better to plan for flexibility in the future. Cat 5 is now the national standard.
Other handy gadgets
A reader tells me that Radio Shack sells a handy two-line tester for $5 which allows you to make sure the polarity (red/green, yellow/black) isn't reversed anywhere (I generally don't recommend Radio Shack since their products tend to be of shoddy quality, but for $5 it's hard to go wrong). You can also check at the Network Interface Device to make sure the phone company doesn't have the polarity reversed; if they do, you should call them to have it fixed at no charge, since reversed polarity can reportedly damage some kinds of phone equipment.
Who wrote this page?
If want to find out more about the nice guy who wrote this page for you, click here.
Please note that I don't provide personal help. I can't be a free help desk for the nation.
Buy me a beer!

|
The information on this page is provided for free. You're under no obligation to do anything in return for me. However, if you'd like to say thanks, you're welcome to buy me a beer. Click here to put money in my tip jar using PayPal: |
How much should you give? Whatever you want, but $3 for a beer would be fine. If you want to give more, I pay $25 a month for this web server, so you can also sponsor the page for a month. (I use the server for a lot of other things besides just this phone wiring page; a major project is the development of some free dictionary resources, so your tip will underwrite this project.)
Warning about an annoying feature of PayPal's page (not my doing): Enter your amount first and click "Update Total" BEFORE you start filling in your credit card info below.
Thanks!
Obnoxious Legal Stuff: To the best of my knowledge, all of the information on this page is correct, and it is provided in hope that it will be useful. However, I assume no liability for any damages, direct or otherwise, resulting from the use of this information, and no warranty is made regarding its accuracy or completeness. Use this information at your own risk.